Working with HTML Page Creation
To view sample HTML pages, go to the ImageViewer website
ImageViewer Sample HTML Pages
You can generate HTML pages, based on any file list and the HTML
settings in Preferences. These generated HTML pages
include:
In addition, the HTML generated by ImageViewer can be customized
to present HTML pages that match your requirements. Read about the
different settings in:
Saving HTML Pages
Grouped
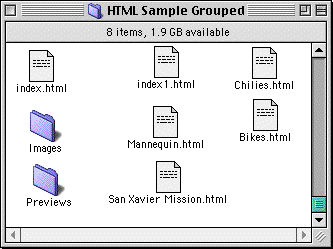
You can save any Catalog file or file list as a grouped
set of HTML files. This makes it easy to create an entire website
of your images that can be navigated and viewed quickly and
easily. For example, creating a HTML Pages Grouped from a list
of sample images shipped with ImageViewer will build a site
that looks something like this:

The HTML Pages Grouped include:
- <name>.html - a "table of contents" file with links to all the image files in the
list(where <name> is the main file name as specified in preferences,
default is index.html).
- <name1>.html - a "contact sheet" or preview table file with links to some or all of the image files in the
list(where <name1> is the main file name as specified in preferences, followed by a number
signifying which contact sheet page starting with 1).
- <name>.html - individual files that
display the actual image (where <name> is the name
of the image).
- Images folder - contains the actual images displayed
in the <name>.html files.
- Previews folder - contains the preview images for the
images stored in the Images folder.
NOTE: No file format conversion is made when copying files to the Images folder(e.g. TIFF to JPEG).
You can convert groups of file using Batch.
To Save HTML Pages Grouped:
- Choose a list of files or catalog file > Save List As > HTML Pages Grouped
option.
NOTE: You can control the appearance and format of the
HTML files by setting these options in Preferences panel #1
and Preferences panel #2.
Saving HTML Pages with
Images
You can choose to save HTML files in the same folder as
the image files themselves. Handy for creating HTML files for
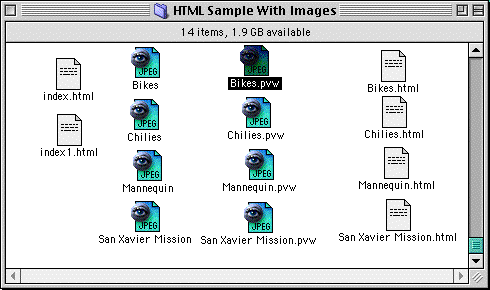
browsing CDs that contain images. For example, creating a HTML Pages with
Images from a list of sample images shipped with
ImageViewer will build a site that looks something like this:

The HTML Pages with Images include:
- <name>.html - a "table of contents" file with links to all the image files in the
list(where <name> is the main file name as specified in preferences,
default is index.html).
- <name1>.html - a "contact sheet" or preview table file with links to some or all of the image files in the
list(where <name1> is the main file name as specified in preferences, followed by a number
signifying which contact sheet page starting with 1).
- <name> - actual image files (where
<name> is the name of the image).
- <name>.html - individual HTML files that
display the image.
- <name>.pvw.html - preview images for the image
files.
To Save HTML Pages with
Images:
- Choose a list of files or catalog file > Save List As > HTML Pages with Images
option.
NOTE: You can control the appearance and format of the
HTML files by setting these options in Preferences panel #1
and Preferences panel #2.
HTML Settings #1
You can customize how your HTML pages are
created by changing the settings in the Preferences for HTML(Settings #1 and #2).
The following sections describe the various settings for panel #1.
To Modify HTML Pages Panel #1:
- Select Preference from the Edit menu.
- Choose HTML #1 from the Preferences popup
menu.

Link To Image:
Use the Link To Image popup menu to specify how the HTML image pages are created
and linked to.
- Directly to Image
No HTML image pages are created, links are made to the actual images.
- To Image Page
HTML image pages are created, links are made to these pages.
- To Image Page (Table)
HTML image pages are created, links are made to these pages. A table is created
to act as a border for the image.
Index Page:
Use the Index Page group to specify the HTML Table parameters
used to create the HTML Index Page.
Image Page:
Use the Image Page group to specify the HTML Table parameters
and additional display info used to create the HTML Image
Page.
Display:
Use the Display group to specify what information appears in an
HTML Contact Sheet. This includes: File Name, Area, and Size.
Colors:
Use the Colors group to set the default HTML colors used in
creating HTML pages. This includes: Background, Text,
Link, Active Link, and Visited Link. Click on the color swatch to
the right of the color setting to change its default color.
Set Header Comments /Set Footer
Comments:
Click the Set Header Comment or Set Footer Comment controls to
specify the comments that should appear in the HTML Contact
Sheet's header or footer respectively. Comment text is placed directly into
the HTML pages and can be used to further customize.
Make Preview:
Enable this option to have ImageViewer create preview
files when generating HTML pages. If this option is off, "contact sheet" pages
will scale the true image to a preview size.
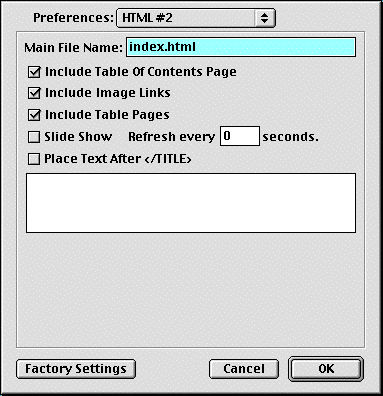
HTML Settings #2
You can customize how your HTML pages are
created by changing the settings in the Preferences for HTML(Settings #1 and #2).
The following sections describe the various settings for panel #2.
To Modify HTML Pages Panel #2:
- Select Preference from the Edit menu.
- Choose HTML #2 from the Preferences popup
menu.

Main File Name:
Specify the file name for the "table of contents" page. Subsequent "contact sheet" pages
will add a number to the main file name starting with 1.
Include Table Of Contents Page:
Enable this option to generate a "table of contents" page. This page will include links to all
the "contact sheet" pages and image pages.
Include Image Links:
Enable this option to generate links from image pages to other pages(Table Of Contents, Return/Previous/Next).
Include Table Pages:
Enable this option to generate "contact sheet" pages.
Slide Show:
Enable this option to generate refresh code for each image page. This will cause the next image
to be displayed after the number of seconds specified.
Place Text After TITLE:
Enable this option to include text, as specified below in edit field, after the TITLE tag.
This allows specifying style sheets.
welcome
| files
| printing
| catalogs
| modify
| html
| browsing
finding
| batch
| views
| windows
| shortcuts
| QTeffects
Copyright ©1997-2000 Plato Grande Software
All Rights Reserved.


